Making Your Own 3D Images from CT Scan- 3D Slicer Tutorial

The Amazing 3D Slicer Tutorial!

This is a step by step walk-thru for anyone who wants to render or play with their CT scans.
I'm going to focus specifically on rendering a model to view the styloids.

I'm using Windows for this guide.
Also, the images are embedded so be sure to use the DESKTOP VIEW if you're on a mobile device.


This tutorial is broken down into Little steps so even those who aren't very comfortable with technology can use the program. It looks long, but it's easy!

There's a lot of picture and I'll be explaining some terminology along the way.


I'm available if anyone has any questions for need any help, too.

It's been Amazingly helpful for me to not only be familiar with my medical images, but also have a clear picture of the issue to take along to doctors or send out to specialists. Doctors are busy, and also human, so it's good to be a pro-active patient. It's also very therapeutic to be able to SEE the monster you're fighting, and science is cool.
There's a whole library of guides for visualizing very specific things on all kinds of tests available on the Slicer website, as well as sample scans that come with the program if you want to play around.


You are going to need:
- 3D Slicer program downloaded and installed.
3D Slicer Website

(Make sure to install the “STABLE RELEASE” version. This, and most other guides are for the STABLE RELEASE version.)
- A CD, or data copy of your CT scan.

As a note, a CT scan with contrast is was you ideally want to use.

I have managed to get the CT scans without contrast to work, and even some MRIs, but it's not a very clear image.
3D slicer is also very image heavy and sucks up your computer resources. If you have an older computer, or just really cheap one like me, you will want to close all your other programs. 3D Slicer also takes its time, so be patient if images don't show up right away or look blurry
.


Ready? Here we go!

3 Likes

1. Open up the program.
You have 3 panels where the views of your 2D scan will appear (sagittal, axial, and coronal planes), a panel where you 3D model will eventually show up, and a control panel.

The control panel is where you're going to do most of your work, and how you fine tune the image to see the styloid processes.
The 3D image is going to be made by putting the 3 planes of your scan together into one image. Think of it like width, depth, and height to make a solid shape.


2. Next, you're going to load your studies into the database.
CT scans are saved as DICOM files (Digital Imaging and Communication in Medicine), which is a standardized file format for recording medical data and imaging. This allows medical professionals to receive and read any medical data anywhere without the trouble of having viewing programs specific to hospitals or regions.


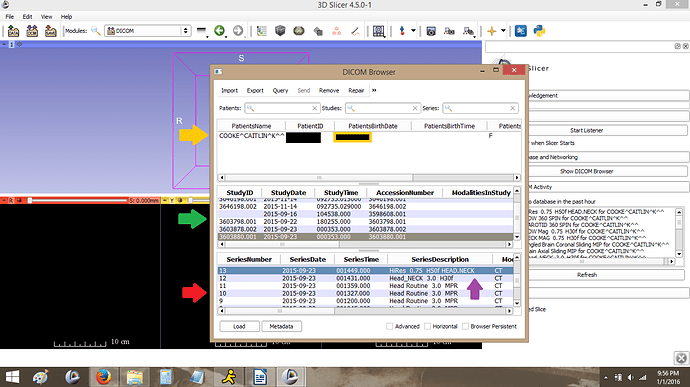
- Select the “Load DICOM” button from the control panel.
Another window will pop up called your DICOM browser.
(Mine already has my name in the Patients panel and a list of studies and image series because I've been playing around with the program, but originally it should be blank.)

- Select “Import” in the upper left corner (Red Arrow in picture)

This will bring up a familiar looking file directory.

- You're going to be using the data on your CD, so use the “Look In:” drop down menu to find you CD drive and select it to view to files and folders on it.
The folder you want is titled something like “Images”. If yours is different, you can try selecting different things until something finally loads. The program will only accept DICOM files.

These are the typical steps..

Look in:
select My computer
select CD drive (D:)
select (single click) IMAGES folder

click the “Import” button.

- A box will pop up asking “Do you want to copy the files to the local database directly or just add the links”. Select “Add Link”
This may take a little while to load.

Copying the files will save the scan data on your computer directly so you can access it without the CD.
For whatever reason, when I try to copy about half the files don't save or are corrupted. It may be a copy protection, or something wrong with the data put on the CD, but either way the scans Don't open correctly.
Add Link makes the program move slower, but it works every time.

3. Select the study you want to render into a 3D model.
You should now have something in the top PatientsName window, a Study ID number and dates in the panel below it, and a list of option in the bottom Series window.

If not...
- Select the patient name in the top box. (yellow arrow)
This will bring up a list of studies available in the middle box. (green arrow)
Select one of the studies
This will bring up a list of series available in the bottom box. (red arrow)


Especially if you have more than one scan on the CD or a CT with contrast, there's going to be a lot of options.

The tutorials I learned from didn't specify which series made the best models, and some of the Series Descriptions can be a little mysterious (For example, the hospital broke my scan up into 2 studies; before and after contrast injection. There's also 9 different studies called “Head Routine”)
Because if this it may take some trial and error to figure out which study or series gets you the images you want

For this tutorial I've selected HiRes 0.75 H50F Head.Neck (Purple Arrow)

- Click the “Load” button in the bottom left corner.
Loading Will take a few minutes, so go grab a snack.

1 Like

4. Link together the views of your 2D scan.
Now your bottom 3 panels should have some vaguely head shaped, somewhat mysterious images from you 2D scans.

If Not: You need to pick a different series. Go back to your DICOM browser by selecting the “Load DICOM” shortcut in the top right (red arrow), and pick something else in your Series list.


-You Should have an Axial view (top to bottom), a Sagittal view (side to side), and a Coronal view of your head/neck.
Take a minute to look through them by moving the scroll bar (Yellow Arrow) left or right.

- Hover your mouse over the Pin icon in the top left of the box (Green Circle)

- Click on the “Link/Unlink” icon (Green Arrow) in just One of your 2D views to link all 3 views together

- Click the visibility icon (Purple Arrow, looks like a closed eye which opens)

5. Render the volumes of your images.
This is going to put all 3 views of your scan together.


- Select “Volume Rendering” from the drop down “Modules” menu at the top of the page.
This will bring up a work space in your control panel.


- Select the Visibility icon and open the eye (Red Arrow)

Make sure the name of the study being rendered (shown next to the eye) matches the name of the study you've currently selected.
Sometimes when I have tried to render more than one series a previous study will be selected instead. If you have the wrong study selected, no 3D image will appear.

- An image should be visible in your 3D view panel now.

If not: click the “Center 3D image” icon in the top left. It may take a moment to load the image. (Purple Circle)

- Adjust the model to an anterior or side view (just so it makes more sense) by hovering over the Pin icon in your 3D image panel, and clicking on a direction in the compass. (Yellow Arrow and Circle.)

A is Anterior a face on view, P for posterior, etc.

- You can enlarge the model by moving your mouse wheel back and forth, or by using the magnifying glass icon in this window too.

- You can Rotate the model by clicking and dragging the image, making it spin around.

6. Assign colors to different body structures.
This will take different densities seen in your scans and recognize them, for the most part) as bone, soft tissue, vasculature, etc.

(As a note, your image may or may not appear to be as blacked out as mine is. Each study in a CT scan is composed of many pictures of thin slices within the body. The more Slices, the more information you have to create your model. Try a few different series on your list and see which one turns out the clearest. Either way, adjustments can be made to better see the bones)

- Under “Display”, there's a drop down menu called “Presets”. Select one of the presets from the options.
I've selected “CT-Bone” for the sake of this tutorial. Different presents may better visualize different structures. (Red Circle)

- You Probably look like a zombie right now.

1 Like

7. Adjust the density of your image to view your bones

This changes how solid your 3D model is. As you can see in the previous image, I still have some of my pesky skin hiding my stylohyoid calcification.

- Use the “Shift:” scroll bar under the Presets menu to change your image density by moving it to the right. (Red Circle)

Go slow, only moving it a little at a time, and give the program time to catch up.

It also helps if you rotate the 3D model so that it's facing left, or right (Symptomatic side if you've only got one).

This may make some weird gray areas on your image. Don't worry, we'll clean that up in Step 9.

- You may need to rotate the model to get a good view of the area, or move the 2D slice pane (The cross of black boxes in the model) out of the way by moving around the slider bar on your 2D view panels.
You can remove the 2D slice pane entirely by going back to the Pin icon on you 2D view panels and Closing the Eye icon.


8. Crop the image to remove jaw/neck and better view the styloids.
Depending on the shape of your head, the angle of your styloid processes, and how much of the head/neck the CT captured, you may need to remove some other structures blocking the view.

This is also useful if you use a higher density to see muscles, cartilage, etc and how they interact with your styloid processes or calcification.


- Under the Display Presets menu (where you picked CT-Bone), check the “Enable” box. (Yellow Arrow)

- Below the display options is an “Advanced” menu. Click to open the options.

- Select the “ROI” tab (Region Of Interest)
(Red Circle)

This will bring up a set of 3 scroll bars.
L-R Range= Left to Right

P-A Range= Posterior to Anterior (Back to Front)
I-S Range= Inferior to Superior (Bottom to Top)

- To remove the front of face/jaw portion of the scan, rotate the model so you are face to face (A on the compass) and move the 2nd button of the P-A scroll bar to the left (Purple Arrow). To remove the chest/spine and view from below, move the 1st button on the I-S scroll bar to the right (Green Arrow).

- Click and move around the 3D image to however you can see them best.
My CT scans, lost most people's are on an angle and Not perfect anatomical center (because I'm human and was in pain) so it's likely that you need to adjust the angle and tilt to get a good view.


8. Fine tune and take screen shots.

In theory, the session and your 3D model can be saved.

Since I have thus far mostly Linked the scans used from the CD I don't have much success in saving the model.

Screen shots are a handy thing to have on my phone as well (which as far as I know doesn't read DICOM.. yet) so I simply take a number of screen captures at different angles.


- Get a bigger 3D view by clicking the View Options icon at the top of the page (Red Circle) and selecting “3D Only”

- Try out different color presets and experiment with shifting the volume density with the “shift” slider bar.
I've switched to CT-Cardiac3 preset in this photo to demonstrate a higher visual clarity of the stylohyoid calcification in the image.

- Remove the gray areas and get a clearer image by selecting “VTK GPU Ray Casting” in the drop down menu under Presets.
(Yellow Circle)
This produces a higher quality image (like in the picture), but it Really slows down the program. Do this last so it's easier to rotate and make cropping adjustments to the image.

- Take pictures from different angles with and without the jaw removed to demonstrate the anatomical involvement of the styloids.
Styloid length is apparently very relative. One person's normal anatomy variation is another person's crippling syndrome. The more pictures the better, and the more information you have to bring your doctor.

- Do a Screen Capture or use the Print Screen function on your keyboard to save the image.
I crop out all the unnecessary program windows in MS Paint and send the images to my phone.

Not fancy, but it's easy.

FINALLY- Please remember...

This is not a diagnostic tool. Still talk to a doctor if you have any concerns.
This is to allow you to be a better informed patient actively participating in your care.
There's a multitude of reasons things can look crushed, or unusual, or concerning in your CT scans and 3D imaging. Some may be a medical issue, some may be a normal variation or incident of the CT scan.
Talk to a professional, and most of all, keep fighting the good fight.


Whew!

I hope this tutorial has been informative.

This is just Version 1, and I intend to streamline and update it in the future as I can.

Please let me know if you have any suggestions, edits, or see areas of confusion. And again, I'm available to answer questions if you're having trouble.

Thanks!

Thanks for this! It's really helpful- I'll add the link into the ES Information section too!

1 Like

Oh Wow!! THANKS... Im gonna try this now maybe the 10th time is a charm'??? lol.... Ill do step by step...and ill probably ask you a hundred questions lol....I have all my photos imported in about 3 files

Actually I need help...lol....I have all my images in all the 3 views....In the 3D section...I have all the images linked together...and I click 3D bone and nothing changes...my face isn't a zombie....lol it still looks like the ct contrast scan but in all the different views and angles.....what did I do wrong..I followed step by step

“In all the different angles”, does this mean it’s a 3D shape? Or like crossed together black boxes?
Make sure to open the eye in your control panel as well, and that the study listed next to it is the correct study.
Try moving the shift around and see if that changes how it looks
Try a different preset setting
Or select a different series from your study if none of that works

Yes I never has my eye open in the control panel only the other part where u stated to open it. If there a setting where I can see the cartilage of my throat better? I can’t really see it that great

You can private message me some screen shots of what you have on your slicer screen so far and I may be able to help better.

That's something you're going to want to search around on the net for, I'm sure there is a way and there's probably some instructions for better viewing cartilage.

aww I got all excited to produce 3D from my CT angio and downloaded and all but couln’t use/open it as my pc is only 32bit win 7

sigh

If you can send me your dicom files I can try and whip something up during my upright times.

hey thanks very much! I will work out how to copy the dicom file - it’s CT angiogram. Do you have an email or dropbox?

yeah I would love to see, some screenshots seem to show bilateral elongation on the CT but not very clear as it is focused more on vertebral arteries which they thought was causing my symptoms.

cheers

Della- the main forum is accessible to the public- best to pm people with your email address.

1 Like

appologies, I didn’t know that. I went to remove my email and it’s already done? sorry

Hello!!! I’m new here nd I have learned so much about ES!! I’m very close to getting diagnosed! I have emailed my Dr for a 3D scan, as suggested on this sight. Wow, I thought I knew so much, I didn’t know about that. I don’t know how long til I get one so I am trying this procedure. I would love to see my CT in 3 D. However, the program crashes everytime at the same point nd I hope you can help! After the looooong download nd clicking the volume rendering nd opening the eye it crashes. 3 times. I have rebooted my old laptop which had thd new windows on it. I’m so grateful for this website!!! I don’t feel so craZy nd I know alot more from this site than anything else on the internet!!! Thanks!!!

Worked like a charm! Thanks for giving step by step instructions!

1 Like

yes. a zombie!